North Tawton micro layout, formerly a Peco 200 entry.

AdeMoore

Western Thunderer
Didn’t know where to put this saw another 200 entry here so decided that’ll do!
After advice really as I’m thinking what I’ve done so far doesn’t work so after any ideas!
Below I have 2 main line tracks one is the modular one where if your lucky and get to the final all 200 modules will be joined together.
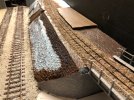
I wanted a higher level N.G. Line which I think does work, but immediately on entry from an accommodation bridge the line heads over an Occupation Bridge. Felt ok and the down mainline had a siding running generally to a wall between the N.G. Embankment and the double line accommodation bridge. Now having built it, (I don’t really do plans it just kinda gets built as I go!) the double bridge seems awkward to fit in. Just a template to see how it’s looking.
7B10DB89-02E4-46F9-BC83-BCFB90C6C2AF.jpeg
Seems no logical way to tie in the two bridges at this close together? Unless someone can see something I can’t!

6158531A-DDDB-427C-91C6-6277D02D8743.jpeg

3390059B-94CF-470E-80BF-6BCEC95028D7.jpeg

So with the above having been poorly thought out I’m thinking move the occupational bridge like halfway down the board then the embankment can run to the back of the hut and will look far better?

98E2AE01-1878-4F27-97A5-760D014AD374.jpeg

N.G. Halt will need shuffling to the end of the board. or or! Put occupational bridge right up this end!
Cheers for anyone looking in and caring to comment.
 
Last edited:

AdeMoore

Western Thunderer
over on the other channel I put forward I couldn’t tie up the Narrow Gauge Occupation bridge and the main line over bridge. Doesn’t work. So I’m proposing moving the occupation bridge to the opposite end of the layout.

But meanwhile I’ve been scratch building the bridge! A first think it’s ok at 4ft away!
I was placing plastikard arch stones, cutting them out was taking an age! So with a thought on how to do the stepped out string course with exterior filler and finding that much quicker, I decided to change tack and finish the arch in that manor. There may have to be a revisit on the plastic part.

DBA17998-A7E3-48C3-9115-C359F348DA12.jpeg

FF82F268-482A-40EB-9D3E-3BFF20F4A1DE.jpeg
E5DA72A5-F60D-4B08-831F-F1D967B9858E.jpeg8741E58F-00F1-4A90-84EC-7BD5E8C1003C.jpeg8E453DFB-D2BA-4873-84F1-15E3A54A3FD0.jpeg70715629-C12D-44EC-B89B-2664019968D8.jpeg072B15FE-98BE-4514-A81E-D04BBEABC02C.jpeg

The returns on the the abutments if that’s the right term, require scribing capping stones adding and the arch and inside walls made and fitted. Then paint. It’s taken far to long so more ready to plonk required!
 
Last edited:

AdeMoore

Western Thunderer
You’ve probably thought of it, but won’t the station buildings take it over the height limit? Or are they just for home use?
Thanks Sandy, Rob had mentioned further up, but we’re all good the N.G. Bridge parapet is higher and that’s 135mm but thanks for drawing my attention to something that I may have missed.
 

AdeMoore

Western Thunderer
The scratch double track bridge is taking an age! Not my forte it would seem.
Should of bought a RTP one. But then there is some satisfaction in building one yourself.
Still a way to go. Side walls under arch to clad. Then meeting corners to fill and scribe. Cappers to add once painted, as intend to keep in large handling format with the foam board as long as possible. Then part it off the foam board to the right size get it in place.

3105BD60-5D21-47A0-B2D1-E2463D6861A7.jpeg


109602E8-169B-4BB5-8B65-6AE80F07B608.jpeg
 

AdeMoore

Western Thunderer
Well the bridge is finally all but done! In primer just needs paint.
For the capping stones I used the exterior filler and scribed it, then added liquitex matte medium for texture.
I think it’s ok still to be finally cut free once painted up for final installation.

88BA072A-13CC-43A9-8AFD-9D193008F76B.jpeg
E1BFFD25-0144-4234-A5C8-B8868585F89B.jpeg
74E49144-49E9-4EF3-98D7-277ED85C10C2.jpeg

still thinking I need to move the occupation bridge up the other end and that will make more sense with what’s below.
I was lucky enough to be in contact with Steve Smith @Stevers on here. He had CAD drawn up a LSWR box and had a thread going on the other channel Here. I made contact as his location appeared close to mine and so it proved. Anyway I arranged to pop and see him to purchase a box 3D kit. But after an enjoyable cup of tea and a close up view of Steve’s various projects, it came to make a choice of box. Unbelievablely Steve had a first incarnation laser cut box which he had completed. Fine looking box too, all painted and done. Saving me valuable time on this project. Added to which Steve entirely generous said he wanted nuffink! For it. Just happy to see it on a layout. So thanks ever so much again Steve.
With the occupation bridge right hand end and a possible siding but certainly gates will make it fit nicer.
I was going for cutting into the embankment but I need to weigh that up with the final location of the NG halt. As at the moment it looks crowded that side of the line. But a shame to only see the back of it!
So in the position below it would be the opposite way round, but I wanted to showcase Steve’s excellent work.
More soon.

BDDDD72F-B1DC-4DCA-9548-D781596BA41F.jpeg0200AF03-19C9-4F81-AD31-2D549598323C.jpeg
9BA4AA89-D303-4213-97DE-14FFC22E4AFE.jpeg
 
Last edited:

AdeMoore

Western Thunderer
Days are counting down, I’m unlikely to get there by the end of September. But seeing what others are producing it makes little difference!
I’m just enjoying putting something together.
Track now stuck down went PVA for speed.

E0F8675A-BFB3-4E49-9DB1-3F3FF0F1C813.jpeg
4EE14CAA-3324-48A6-AAC1-909BF1B5FB01.jpeg
The down line spaced and fixed down also. Track painting in progress.

C056275A-77FA-4CDD-B25B-CD818DC2C8A8.jpeg

More painting. Still need to paint those pink walls in the modelling room!

8483ADB1-3580-4B0E-BD46-4D12EAB10ABF.jpeg

Sleepers dry brushed in a almost white grey. Not very noticeable below I’ll do a fly by shot or close up. Also found the delivery box on end fits between the bearers exactly so the diorama can be placed anywhere to photo so moved next door into the snug and took these! No pink walls!

52B127E5-2BD5-41C8-BC8E-37573267958E.jpeg

059C5362-BDB6-4CCF-BBE2-8F8CF968AA44.jpeg
 
Last edited:

AdeMoore

Western Thunderer
So moving on into October.
Ballasting commencing.
I’ll be washing over that ballast to improve it. Worried it looks a bit small as gone 2mm ballast as many recommend.

55F4C28C-B750-4BC3-A693-C04E1C9C9F58.jpeg72EAEC95-53F2-4B96-9260-3A52C7CA54E7.jpeg

Below used some dark earth scatter, as it’s gonna be dying days of the line and weed strewn track. Think it may be ok I’ll be adding a bit of ballast here and there. This is with dilute matte medium heaped up.

D622CA17-F7F4-4B0D-9330-96D555FB75BB.jpeg

Below the bodgery of the crossing timbers. Hopefully I can rescue it.

3F42E66B-AFF0-4267-9F88-C19B5DE7CDCA.jpeg
Then hoovered off below.

3B09D63A-D5AE-49C6-9197-B741CCFD9944.jpegE11020DC-6430-4B13-8A30-0376E9FB9B16.jpegA3634107-36D3-4C6E-87A8-3ACAF555841A.jpeg
Below beginning of the rescue more timbers scibbed.

9BA9BB66-5D92-49F9-BBEB-F111F3396DDD.jpeg424C28C4-BAF4-4785-80A9-74459B2AF45F.jpeg

Need to extend the track to the end of the plank now it’s never going in the competition. So the ballast can be completed properly.
More soon.
 

Attachments

  • B46F342E-6072-413C-90F8-5C97562B7634.jpeg
    B46F342E-6072-413C-90F8-5C97562B7634.jpeg
    469.3 KB · Views: 2

AdeMoore

Western Thunderer
More crossing works.
1st coats of grey on the foam board track, talc sprinkled on for a bit of texture and rubbed in a bit later on. Think I read on @Mullie’s thread the virtues of talc for textures.

FDE84308-2635-4E07-B96A-44F9576884F7.jpeg
Below because the original Peco board had a fixed circa 5mm high track base that you had to fix your supplied length of track to, it does make for a higher than normal datum t work from.
So 5mm foam board is stuck in place making up the levels.
Then ready mixed exterior filler being spread to eye in the various levels to make them join up.

A0BED2FD-55B8-4A71-AB4E-80BF097169F1.jpeg
84E893F9-3EFF-4FD2-9874-1F250D459508.jpeg
 
Last edited:

AdeMoore

Western Thunderer
Got the filler levelled off, then I thought high time I brought in the buildings and locos to see how it’s looking.

A24F3FE4-9D7E-4A67-AC2C-23DB6737FA48.jpeg

A71FC6A9-7647-4EF7-A3AF-9ACB3090A628.jpeg

469E58D8-180C-4175-B31B-7FF331D45659.jpeg


DB3E00B7-413D-4A68-9E57-27B1C6C4D43C.jpeg

902C73D9-C63F-4A20-AEAC-F72844A1EE49.jpeg

86F48230-6B2D-4BD2-B95B-5C1B3E94D844.jpeg

C85F138E-8B6B-4C97-B074-84E85D6EA690.jpeg

869C4B79-D568-4147-B0EE-719767183CC9.jpeg


B411BDB8-736C-4723-8FC5-337E3289F4FD.jpeg

Would have been better outside in some natural light. But hey it’s coming on. May even iron out some of those backscene papers and use them.
Should of dug a few coaches out to hang behind Lynton but that can wait until next time.
 

Mullie

Active Member
Looking good.

Talc is a really useful tool including as a matting agent. I got the idea from the Martyn Welsh weathering book many years ago.
 
Top